Reference
Structural Overview
General layout concept of the interface
NEST Desktop consists of three segments with different purposes.
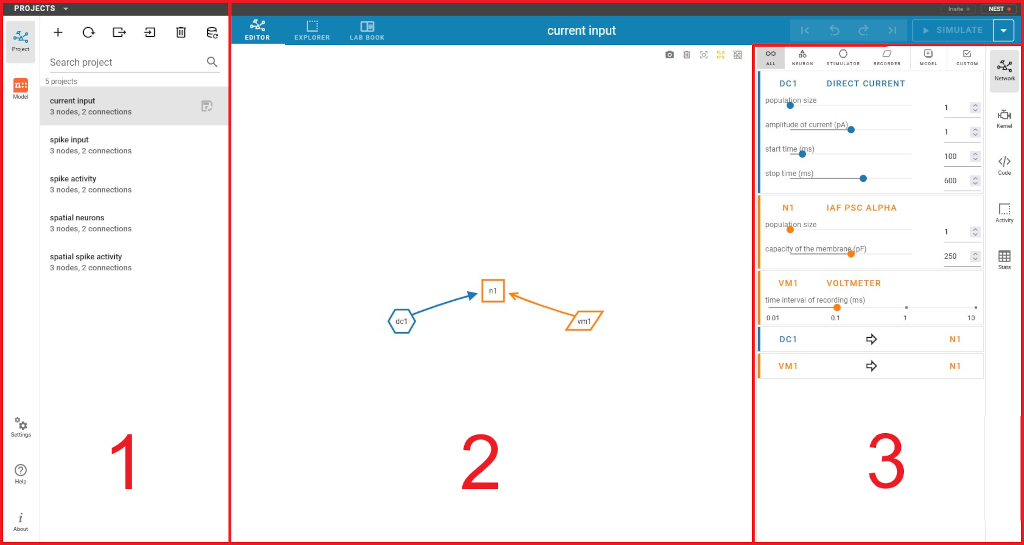
The layout of NEST Desktop with the three main areas (1) - (3).
The left column (1) shows the navigation to route pages. The center area (2) renders the main content of the page, whereas the right column (3) displays the controller for content modification.
Navigation sidebar
The navigation sidebar is the main navigation element and available in (nearly) every view. It contains the following icon buttons, which lead to the pages described below.
For a lot of these buttons, there are further options available via right click.
- Project
create and edit networks as well as run simulations
- Model
manage and edit your models
- Settings
settings of NEST Desktop (backend, user interface, etc.)
- Help
reference to the documentation on ReadTheDocs
- About
info about NEST Desktop
For the sections Project and Model, the navigation sidebar will be extended with a second sidebar, containing a list of available projects and models, respectively.
Main content
This area displays the main page content. In the project and model section, it contains a header bar with the possibility to select different sub-views and - in the project section - also the edit history as well as the button to start a simulation. Performing a right click on the simulation button opens a dropdown menu, which offers some basic simulation options. On the right side, it contains a sidebar (described below) to control and edit the content, e.g. parameter values, etc.
Controller sidebar
This sidebar allows to edit the content. A lot of its functions can also be found in the context menu of the main section. Please be aware that node names will offer a dropdown menu on left click, while the connection arrows offer such a menu on right click. Please be aware that some content requires a successful simulation execution to exist.
About view
This view shows the program info about NEST Desktop. In the center, you can see a short explanation as well as the technical details.
At the bottom, you will find further references for background information.
In a slightly varied form this view is used as the landing page (containing buttons to start a new project or load one) when yor start NEST Desktop.
Project section
The project section manages all project-related tasks.
Sidebar
A click on the project switches to the project area. If you are already in that area, this button toggles the list of projects, a second sidebar. In that list, you can manage your projects, e.g create, rename, arrange or delete them.
See also
:doc:’/user/usage-advanced/project-view’
Main content of the page
In the project area, the main content consists of an area, where you can switch between the network graph of the project, the results of the simulation and the print view of the simulation results. The slider in the top bar gives the possibility to switch between these views. For the simulation results, there is also the possibility to switch between 2D and 3D representation, if the results have spatial properties. The top bar contains the button to start the simulation. A right click offers further options
Model view
Left sidebar
In this view you can manage your models. The left sidebar shows a list of the available models. You can search the models list in the search bar on top of the list. Below the search bar, you have the possibility to select the following filter options regarding node type and model source:
- Installed
selects only models which are installed locally
- GitHub
selects only models which are available on GitHub
- Neuron
selects all neuron models
- Stimulator
selects all stimulator models
- Recorder
selects all recorder models
- Synapse
selects all synapse models
Please be aware that the model source filters work like a logical AND, while the node type filters work like a logical OR. The node and source filters are combined with a logical AND (e.g. “(Installed AND GitHub) AND (Neuron OR Simulator)”).
Center area
The center area displays the content for the model. The bar on top contains three selectors on the left side, which allow to switch between different content for the center area:
- DOC
model documentation (section contains a reference to the content within the NEST documentation in the upper right corner)
- EXPLORER
diagram(s) of the simulation results for an exemplary network containing this model (code can be found in the right sidebar)
- EDITOR
input fields to adjust all parameter settings, including value, value range, displayed unit and label, but also the settings for the input field in NEST Desktop
Right sidebar
Here you find the following three icon buttons in the sidebar to dislay these information:
- Defaults
default values for all parameters (even for some which cannot be altered in NEST Desktop)
- Model
input fields to change the parameter values (options can be adjusted in the “EDITOR” section of the center area)
- Code
code for the exemplary network which is used to generate the diagrams in the “EXPLORER” section of the center area